| ���̣�Programming���Ǿ�����������ĺ��Q������Ӌ��C���a��Qij�����}����ij��Ӌ���wϵҎ(gu��)��һ�����\�㷽ʽ��ʹӋ���wϵ����ԓӋ�㷽ʽ�\�У�����K�õ�����(y��ng)�Y(ji��)�����^�̡�����ʹӋ��C�܉����⣨understand���˵���D����ͱ�회����Q�Ć��}��˼·���������ֶ�ͨ�^Ӌ��C�܉��������ʽ���VӋ��C��ʹ��Ӌ��C�܉����(j��)�˵�ָ��һ��һ��ȥ���������ij�N�ض����΄�(w��)���@�N�˺�Ӌ���wϵ֮�g�������^�̾��Ǿ��̡� ���������Q�� ��CSS+JS�����M�ȗl(��) ������������ �����W(xu��)��(x��)���ʹ��CSS+JavaScript�ķ�ʽ���F(xi��n)��Ҋ���M�ȗl�� ���������a�� <html xmlns="http://www.w3.org/1999/xhtml" >
<head>
<title>���}�-��վ��www.xue51.com��</title>
</head>
<body>
<style type="text/css">
#divLoadCont{position:absolute; z-index:500;
left:0; top:0; width:100%; height:98%;
clip:rect(0,100%,100%,0); background-color:white;
layer-background-color:white; }
#divLoad1{position:absolute;
layer-background-color:silver;
background-color:silver}
#divLoad2{position:absolute; left:0; top:0;
layer-background-color:navy; background-color:navy}
#divLoadText{position:absolute; background-color:transparent;
font-family:arial,helvetica; color:Navy; font-size:14px; }
</style>
<script language="JavaScript" type="text/javascript">
function pro_bwcheck(){
//�z�y�g�[���Ĵ��a-ͨ��
this.ver=navigator.appVersion
this.agent=navigator.userAgent
this.dom=document.getElementById?1:0
this.opera5=this.agent.indexOf("Opera 5")>-1
this.ie5=(this.ver.indexOf("MSIE 5")>-1 &&
this.dom && !this.opera5)?1:0;
this.ie6=(this.ver.indexOf("MSIE 6")>-1 &&
this.dom && !this.opera5)?1:0;
this.ie4=(document.all && !this.dom && !this.opera5)?1:0;
this.ie=this.ie4||this.ie5||this.ie6
this.mac=this.agent.indexOf("Mac")>-1
this.ns6=(this.dom && parseInt(this.ver) >= 5) ?1:0;
this.ns4=(document.layers && !this.dom)?1:0;
this.bw=(this.ie7 || this.ie6 || this.ie5 ||
this.ie4 || this.ns4 || this.ns6 || this.opera5)
return this
}
var bw=new pro_bwcheck()
numImages=12
//Ĭ�J10���DƬ
loaderWidth=350
//�O(sh��)���M�ȗl�Č���
currentImg=0
function pro_doc_size(){
//�Д��@ʾ�^(q��)��
this.x=0;this.x2=bw.ie &&
document.body.offsetWidth-20||innerWidth||0;
this.y=0;this.y2=bw.ie &&
document.body.offsetHeight-5||innerHeight||0;
if(!this.x2||!this.y2)
return message('���w�Č��Ⱥ߶Ȳ���')
this.x50=this.x2/2;this.y50=this.y2/2;
return this;
}
function pro_obj(obj,nest){
//���x����г��d�M�ȗl�Ŀؼ�����
nest=(!nest) ? "":'document.'+nest+'.'
this.evnt=bw.dom? document.getElementById(obj):
bw.ie4?document.all[obj]:bw.ns4?eval
(nest+"document.layers." +obj):0;
this.css=bw.dom||bw.ie4?this.evnt.style:this.evnt;
this.ref=this.css
this.w=this.evnt.offsetWidth||this.css.clip.width||
this.ref.width||this.css.pixelWidth||0;
return this
}
pro_obj.prototype.moveIt = function(x,y){
//���x�Ƅӷ���
this.x=x;this.y=y; this.css.left=x;this.css.top=y
}
pro_obj.prototype.clipTo = function(t,r,b,l,setwidth){
//���¶��x�ü�����
this.ct=t; this.cr=r; this.cb=b; this.cl=l
if(bw.ns4){
this.css.clip.top=t;this.css.clip.right=r
this.css.clip.bottom=b;this.css.clip.left=l
}else{
if(t<0)t=0;if(r<0)r=0;if(b<0)b=0;if(b<0)b=0
this.css.clip="rect("+t+","+r+","+b+","+l+")";
if(setwidth){this.css.pixelWidth=this.css.width=r;
this.css.pixelHeight=this.css.height=b}
}
}
var oLoad2
function startLoading(){
page=new pro_doc_size()
//�����O(sh��)�ü��d�ؼ���һЩ��������
oLoadCont=new pro_obj('divLoadCont')
oLoad=new pro_obj('divLoad1','divLoadCont')
oLoad2=new pro_obj('divLoad2','
divLoadCont.document.divLoad1')
oLoadText=new pro_obj('divLoadText',
'divLoadCont.document.divLoad1')
oLoad.moveIt(page.x50-loaderWidth/2,page.y50-20)
oLoadText.moveIt(loaderWidth/2 - oLoadText.w/2,10)
oLoad.clipTo(0,loaderWidth,40,0,1) //�ü�^(q��)��
oLoad2.per = loaderWidth/numImages //�ٷֱ�
}
function loadIt_display(ok){
currentImg++
if(oLoad2) oLoad2.clipTo(0,oLoad2.per*currentImg,40,0,1)
//�ü��@ʾ�ą^(q��)��
if(currentImg<=numImages) setTimeout("loadIt_display(1)",200)
//ʹ�ö��r��������d�DƬ
else{
oLoadCont.css.visibility='hidden'
//�M�ȗl���d��ɺ��[��
}
}
</script>
<div id="divLoadCont">
<div id="divLoad1">
<div id="divLoad2"></div><br>
<div id="divLoadText">�����d�У�Ո�Ժ�...</div>
</div>
</div>
<script>
startLoading()
loadIt_display(1)
</script>
</body>
</html>
���\��Ч���� 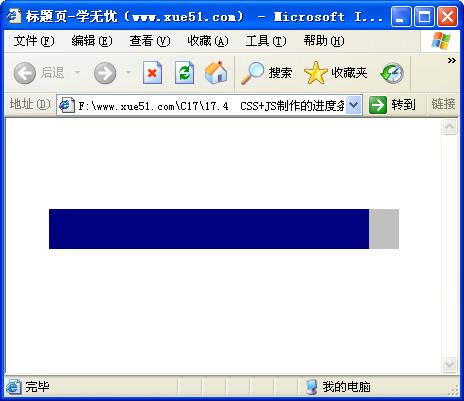 ���y�c������ ���������c���ژ�ʽ����div�ӵIJ��֡���ʽ���O(sh��)��div�ı���ɫ��߅���ɫ���{ɫ��Ȼ��ʹ��JavaScriptӋ���M�ȗl�Č��Ⱥ�ÿ���@ʾ���M�ȣ��������c�ǡ�clipTo���������������¶��x�˴˷�����Ŀ���nj��F(xi��n)һ�����ΉK��^(q��)����@ʾ�� ��Դ�a���d�� ����JS���a�Ĝʴ_�ԣ�Ո�c������CSS+JS�����M�ȗl(��) �M�б�����Դ�a���d
ʹ�þ����Z�Ԍ��ij�������ÿ�lָ�����(y��ng)Ӌ��Cһ���ض��Ļ������������Գ���ռ�Ã�(n��i)���١���(zh��)��Ч�ʸߡ�
| 