|
��վ��X֪�R�ṩ����ܛ��֪�R,Ӌ��C�W�jܛ��֪�R,Ӌ��Cϵ�y����֪�R,��X����֪�R,��X�����ų�����X���R��ȫ,���������õČW����X!����e�ģ�ֻ���й�ͬ�Đۺã���ܛ���ͻ��W�lչ��һ������
������һ���������C�� ����1)���_ Finder->���ó���->���ù��� -> 耳״��L�� ; ����2)�Γ�“耳״��L��”�x��“�C��”���x��“�����C��”���C�����Q������ iPhone Developer��
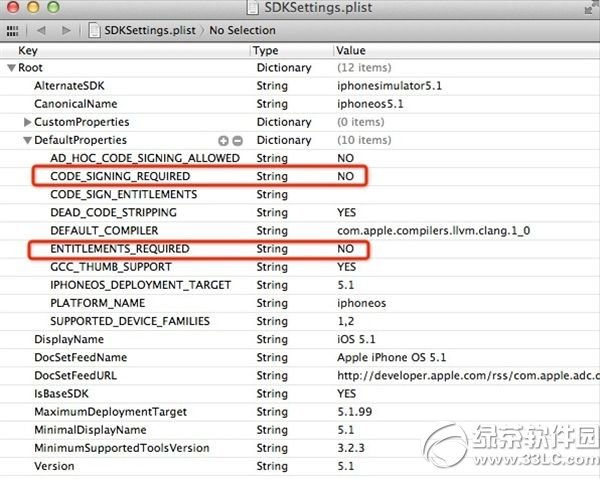
�����ڶ�������XCode�����ļ� ����ע���������ļ��o�����i�]�Й������ģ����ԏ���һ�ݳ������ĺ�֮��ԭ������Q�� ����1)��SDKsettings.plist�ļ�/Applications/Xcode.app/Contents/Developer/Platforms/iPhoneOS.platform/Developer/SDKs/iPhoneOS5.1.sdk �������_ԓĿ��µ�SDKSettings.plist�ļ�����CODE_SIGNING_REQUIRED��ENTITLEMENTS_REQUIRED��ֵ�ij�NO
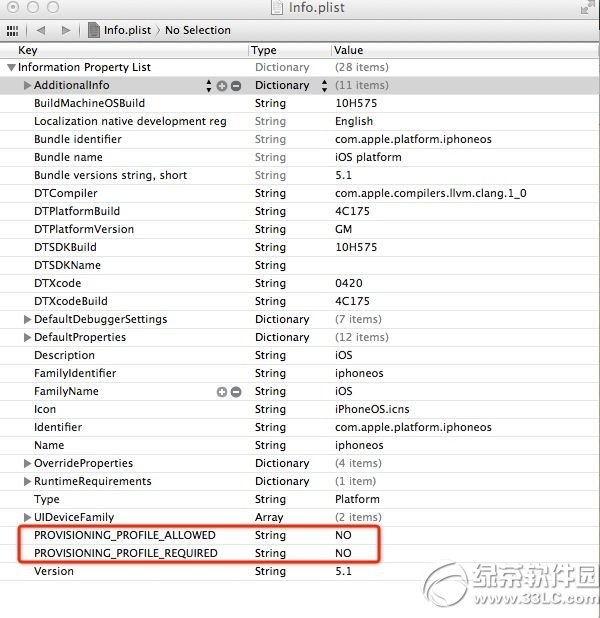
����2)��Info.plist�ļ� ����/Applications/Xcode.app/Contents/Developer/Platforms/iPhoneOS.platform/ ������XCode���_ԓĿ��µ�Info.plist�ļ����ғ�--Add Row�����Ӄ�헣� ����PROVISIONING_PROFILE_ALLOWED ֵ�� NO ����PROVISIONING_PROFILE_REQUIRED ֵ�� NO
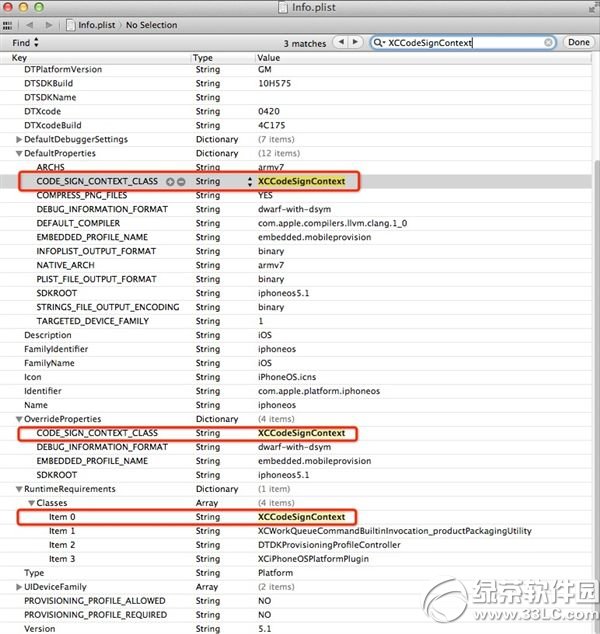
����3)������Info.plist�ļ��е� "XCiPhoneOSCodeSignContext" ��Q��"XCCodeSignContext"(��3̎)
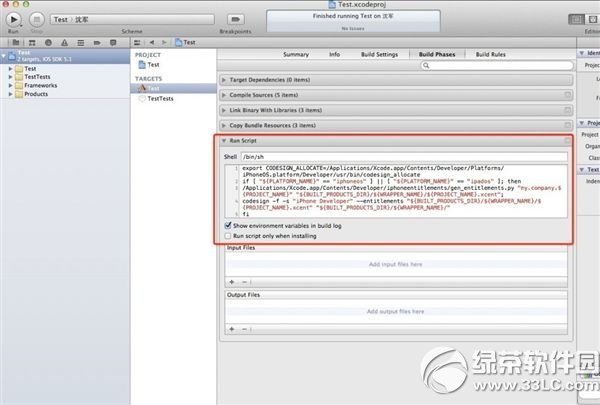
�������������O��gen_entitlements.py�_������ ����ע����������X�W�ˣ���ô����1)����������������Ŀ��Ԅӄ���iphoneentitlements�ļ��A�����µ�gen_entitlements.py�ļ�������к�]������ָ���ļ���Ո�؏͈��������������ߓQ�ڶ��N�������ɷN�����_���ļ��ķ������xһ�N�� ����1)�ڽK�ˈ���������� ����mkdir /Applications/Xcode.app/Contents/Developer/iphoneentitlements ����cd /Applications/Xcode.app/Contents/Developer/iphoneentitlements ����curl -O http://www.alexwhittemore.com/iphone/gen_entitlements.txt ����mv gen_entitlements.txt gen_entitlements.py ����sudo chmod 777 gen_entitlements.py ����2)�����������гɹ�֮����/Applications/Xcode.app/Contents/Developer/Ŀ�������һ��iphoneentitlements�ļ��A�����µ�gen_entitlements.py�� ������������X�]���W���߲����Ԅ��������PĿ��ļ�����ô��Ҫ�ք���������Ŀ䛄���ָ�����ļ����S����Ҫ�ogen_entitlements.py�O �Ù��ޡ� ����gen_entitlements.py�_���ļ��ă������£� ����#!/usr/bin/envpython ����import sys ����import struct ����if len(sys.argv)!= 3: ����print "Usage: %s appnamedest_file.xcent" % sys.argv[0] ����sys.exit(-1) ����APPNAME =sys.argv[1] ����DEST =sys.argv[2] ����if notDEST.endswith('.xml') and not DEST.endswith('.xcent'): ����print "Dest must be .xml (for ldid) or.xcent (for codesign)" ����sys.exit(-1) ����entitlements =""" ����application-identifier ����%s ����get-task-allow ����"""% APPNAME ����f = open(DEST,'w') ����ifDEST.endswith('.xcent'): ����f.write("\xfa\xde\x71\x71") ����f.write(struct.pack('>L',len(entitlements) + 8)) ����f.write(entitlements) ����f.close() �����ڽK�˽ogen_entitlements.py�O�Ù���(���ܕ�Ҫ��ݔ���ܴa) ����sudo chmod 777 /Applications/Xcode.app/Contents/Developer/iphoneentitlements/gen_entitlements.py ����xcode5��C�{ԇ�̵̳��IJ������Ŀ���� (ÿ���½��Ŀ��Ҫ����) ����1)�c���Ŀ�D�ˣ��ҵ�"BuildSettings"�x��µ�"Code Sign Identity"������ֵȫ���Ğ�"Don't Code Sign" ����2)�ГQ��Build Phases�x헣��c�����½ǵ�Add Build Phase��Ȼ��Γ�Add Run Script��Ȼ����Run Script��ݔ�������_���� ����export ����CODESIGN_ALLOCATE=/Applications/Xcode.app/Contents/Developer/Platforms/iPhoneOS.platform/ Developer/usr/bin/codesign_allocate ����if [ "${PLATFORM_NAME}" =="iphoneos" ] || [ "${PLATFORM_NAME}" == "ipados"]; then ����/Applications/Xcode.app/Contents/Developer/iphoneentitlements/gen_entitlements.py "my.company.${PROJECT_NAME}" "${BUILT_PRODUCTS_DIR}/${WRAPPER_NAME}/${PROJECT_NAME}.xcent"; ����codesign -f -s "iPhone Developer" --entitlements "${BUILT_PRODUCTS_DIR}/${WRAPPER_NAME}/${PROJECT_NAME}.xcent" "${BUILT_PRODUCTS_DIR}/${WRAPPER_NAME}/" ����fi
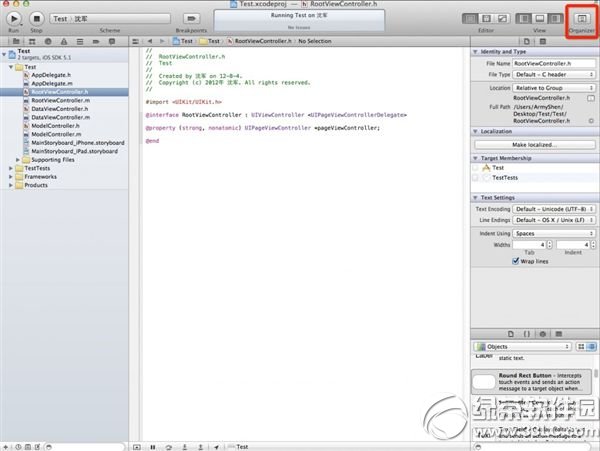
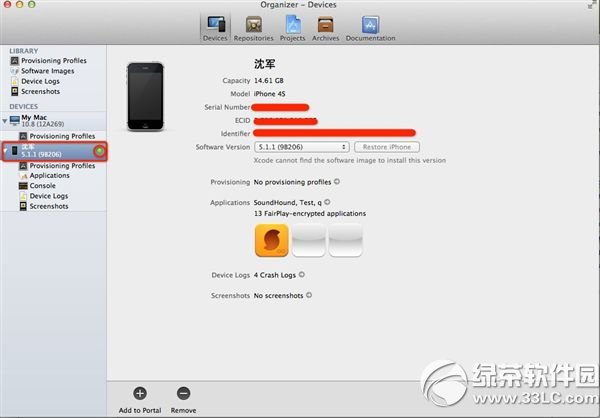
�������岽���B���O��(iphone/ipad) �����cXCode���Ͻǵ�Organizer�D�ˣ�Ȼ���x������O�䣬����߅�������c��“Use for Development” ����;
�����˕r����O�����Q��߅��ԓ�@ʾ�Sɫ��С�������°β唵������Organizer�Е����Fһ���M�ȗl�����@���M�ȗl���꣬С���͕�׃�ɾGɫ���_�lģʽ �ѽ����á�
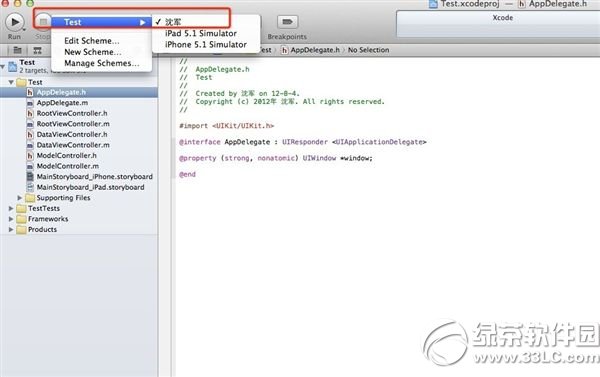
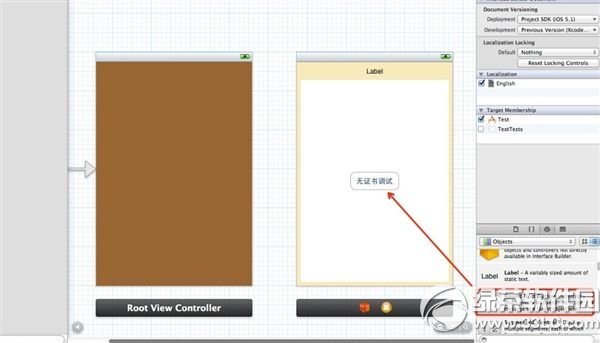
����--�yԇ��C�{ԇ�� ��������һ��Page-based Application���̣���BuildSettings��Build Phases��������P����(�������IJ�) ����1)�x������O��
����2)�S����һ��button��Ȼ���c���\��(Run)
����3)iphone�\��Ч���؈D
����xcode5��C�{ԇ�̳̾͵��@�←~ �W���̳̿������Տ����T����ͨ����X֪�R |
��ܰ��ʾ��ϲ�g��վ��Ԓ��Ո�ղ�һ�±�վ��
��վ�l����Win7������ϵ�y��Win10�������XP������ϵ�y�H�邀�ˌW���yԇʹ�ã�Ո�����d��24С�r�Ȅh�������������κ��̘I��;����t�����ؓ��Ո֧��ُ�Iܛ����ܛ����
��վ�����YԴȫ�������ھW�j�YԴ,���ַ������ę���,Ո���r֪ͨ�҂�(),�҂������r̎��.
Copyright © 2018-2020 �}��ϵ�y���dվ �֙Cվ �P�ڱ�վ